Export to LayOut
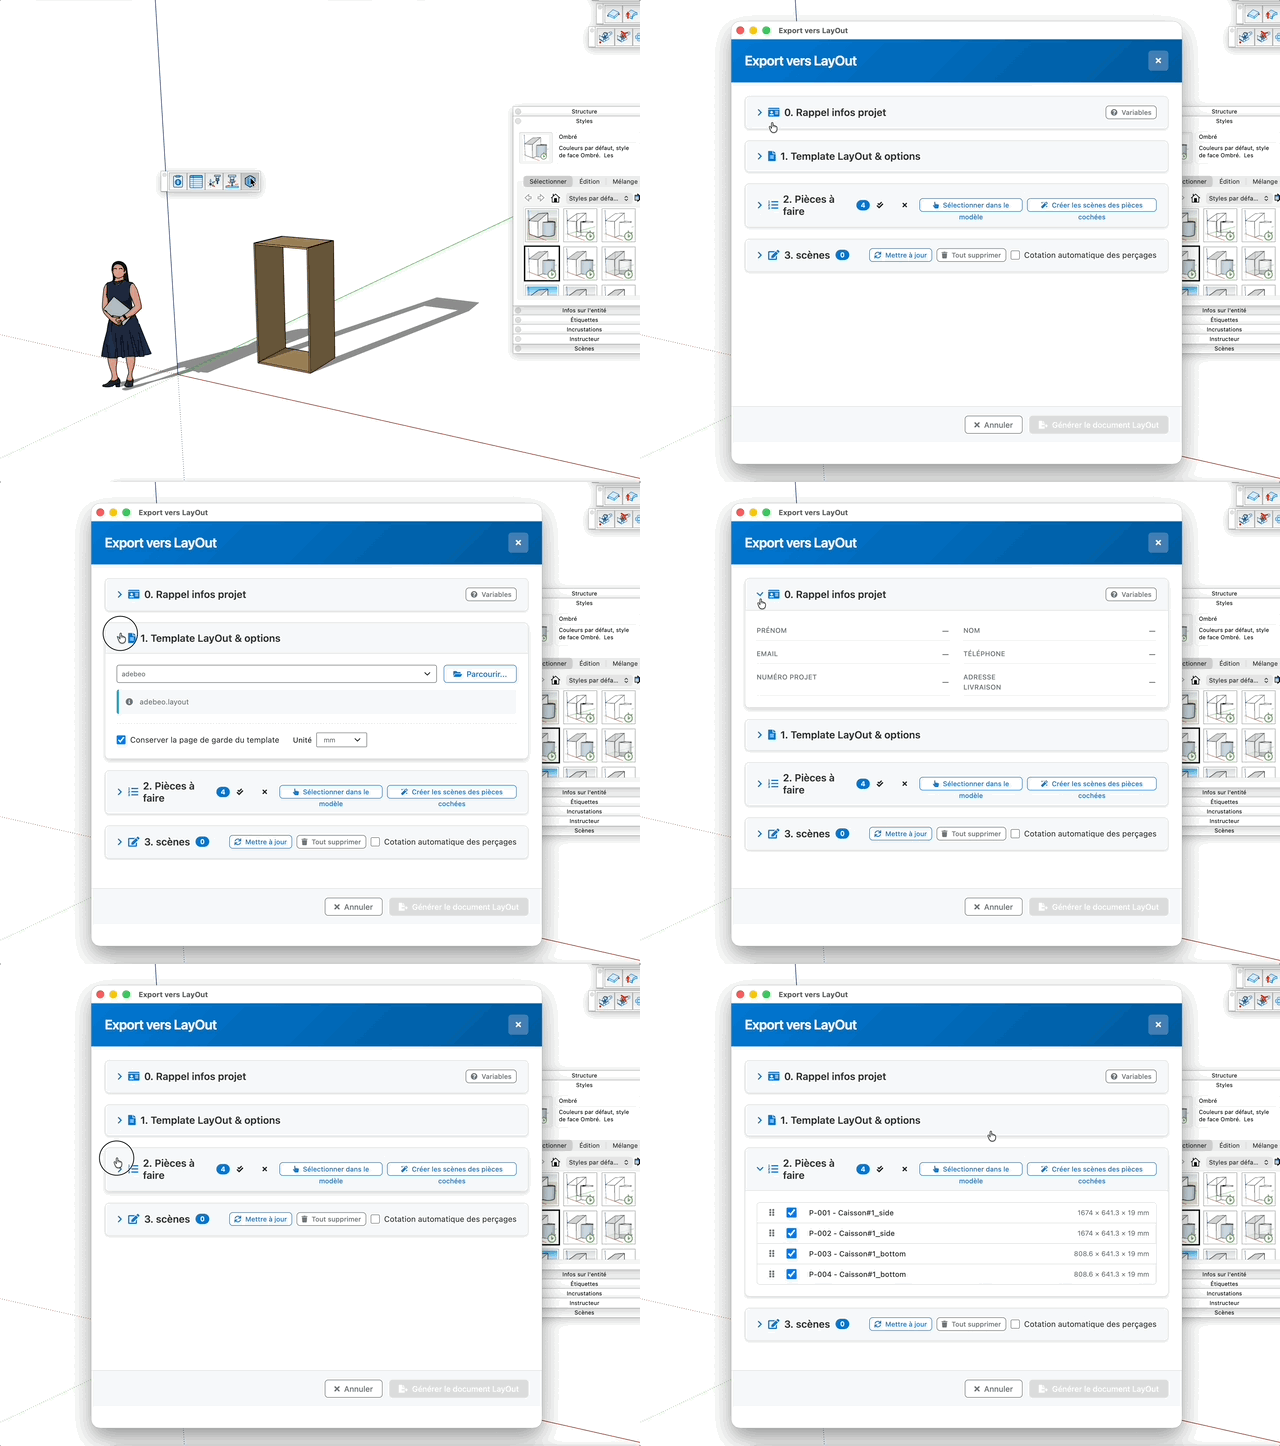
Prepares the shop folder in two steps: first the export of one .skp file per part (the part and its hardware, into a folder next to the model), then the generation of a LayOut document with one page per part (standard views, dimensions and project information). No scene is added to the model.
This is not a drawing tool: the command opens a dialog window. The model must be saved — it is saved automatically when the window opens and again just before generation.
How it works
- Launch the command from the CNC toolbar (or the Adwood menu)
- Section 0 — check the project information carried over into the LayOut document
- Section 1 — choose the LayOut template and the document unit
- Section 2 — check and order the parts; export their files already if you wish
- Click "Generate the LayOut document" and choose where to save the
.layout file: it is created, then opened in LayOut
The sections behave as an accordion: click a title to expand it, which collapses the others. The state is remembered from one session to the next.
Section 0 — Project information
Reminder and quick editing of the information that fills the title block of the LayOut document.
- Variables (button) — shows or hides the help about the LayOut variables. Insert them into your template through Text > Insert Auto Text: their value is rewritten on every export.
<adwood_client_first_name> — client first name<adwood_client_last_name> — client last name<adwood_client_email> — email<adwood_client_phone> — phone<adwood_client_address> — client address<adwood_project_number> — project number<adwood_project_delivery_address> — delivery address<adwood_project_delivery_instructions> — delivery instructions<adwood_project_notes> — notes
- First name / Last name — client identity
- Email / Phone — client contact details
- Project number — job reference
- Delivery address — delivery location
Each field is saved into the model as soon as you leave it (Tab, Enter or a click elsewhere), and only if it really changed. The variables missing from this section (client address, delivery instructions, notes) are entered with the Project information command; they are still exported to LayOut.
Section 1 — LayOut template & options
- Select a template… (list) — the Adebeo Adwood template shipped with the extension comes first as the default, followed by the templates installed with LayOut and by your own templates
- Browse… (button) — points at any
.layout file as a template; it is added to the list and selected
- The path of the chosen template is displayed under the list, as a check
- Keep template cover page (checkbox) — when ticked, the first page of the template is left untouched and serves as a cover page: the first part then takes the second page of the template if it has one, otherwise a page is added; every following part gets a page appended. When unticked, the first part reuses the first page of the template
- Unit (list: mm, cm, m, inch) — unit of the LayOut document and of the generated dimensions. Precision stays equivalent to 0.1 mm whatever the unit
- Automatic hole dimensions (checkbox) — adds hole dimensions and markers to the LayOut pages, along with the drilling table
- Replace existing part files (checkbox) — when checked, the export overwrites the files in the folder; when cleared, a numeric suffix is added and the old files are kept
Section 2 — Parts to make
List of every panel in the model, including those nested inside components. The badge shows the number of parts detected.
- Handle (the six dots on the left) — drag and drop a row to change the display order of the list. The pages of the LayOut document are always sorted by part label
- Checkbox — includes the part in the export
- Label — reference and name of the part (e.g.
P-001 - Left stile)
- Dimensions — net length × width × thickness, in mm
- Select all (double tick) — ticks every row
- Deselect all (cross) — unticks every row
- Pick in the model (button) — clears the selection, then hands over to the SketchUp viewport: click the parts you want, the list ticks itself live and the parts left out are greyed. Leave the tool (Esc or the space bar) to come back to the window
- Export files for checked parts (button) — writes one
.skp file per checked part without generating the document; it stays disabled until at least one part is checked
If the model holds no Adwood panel, a message says so and the list stays empty.
Each part is written to <model name>_<Panels>/<label>.skp, next to the model, with one scene per view. Hardware sits on a Hardware tag, visible on the ISO view only, so the machining views stay legible. Two parts sharing a label share one file and one page, whose title block states the quantity.
Window footer
- Generate the LayOut document — saves the model, exports the files of the checked parts, creates the document from the template and opens it in LayOut. Disabled until a template is chosen and at least one part is checked
- Cancel and the close cross at the top right — close the window. Files already exported and saved project information are kept
Keys
- Enter = validate the project information field being typed
- Space bar = leave the picking in the model and come back to the window
- Esc = Cancel the operation
Tips
- Prepare your own LayOut template with your auto text variables: the title block then fills itself on every export
- Template, unit, part order and ticked boxes are remembered model by model: a second export starts from your settings
- Do not move or rename the part files folder: the LayOut document refers to it by path
- After any change to a part, export the files again before regenerating the document
- Two parts with the same label are grouped: a single file, a single page, and the quantity stated in the title block
- Fill in the project number before generating: it also helps to name the LayOut file properly in your folder tree